Most settings guides hand you a wall of sliders and let you figure out which ones matter. This one starts with the fact that changes the whole conversation:
In WoW Forever, combat values are secret to addons. Enemy health, damage numbers, and threat are hidden from the addon API — the same restriction Midnight runs. WeakAuras can't build you a rotation helper. Threat meters can't tell you when you're about to pull. Boss warning addons can't read what they need to warn you about.
Blizzard's position is that addons shouldn't be required, and they've backed it by building the tooling in: a Cooldown Manager, a damage meter, and a swing timer all ship with the client. Boss fights are designed to be playable without warning addons.
Which means your settings menu isn't a convenience layer any more. It's your entire interface toolkit.
So this guide is ordered by what that toolkit actually does for you — the settings that keep you alive, the settings that give you frames, and then the full presets at the bottom if you just want numbers to copy.
First: Can Your PC Run It?
Forever raised the GPU floor, and the way it raised it confuses people. Here's the actual requirement:
Requirement | Spec |
|---|
GPU | DirectX 12-capable, 4 GB VRAM |
Starting points | GeForce GTX 10 series, AMD RDNA 1, Intel Xe2 LPG |
Required feature | RGBA16F UAV support in compute shaders |
The confusing part, explained: the cutoff is a feature cutoff, not a performance cutoff. A GeForce GTX 750 Ti from 2014 is still supported. A GTX 780 from 2013 — a substantially more powerful card — is not. The 750 Ti is Maxwell architecture and supports the compute shader feature Forever needs. The 780 is Kepler and doesn't.
So don't judge your card by its benchmark score. Judge it by its architecture. Maxwell and newer on the Nvidia side, GCN 4 and newer on AMD.
For reference, current retail WoW asks for a DX12 GPU with 3 GB VRAM. Forever asks for 4 GB. That one gigabyte is where a lot of older builds fall out.
And a note worth having: cards below the stated minimum will often still launch the game. The cutoff defines whether the client can run at all, not whether it runs well. If you're below the line, the settings below for low-end hardware are where you start, and native resolution is the first thing to give up.
The Settings That Keep You Alive
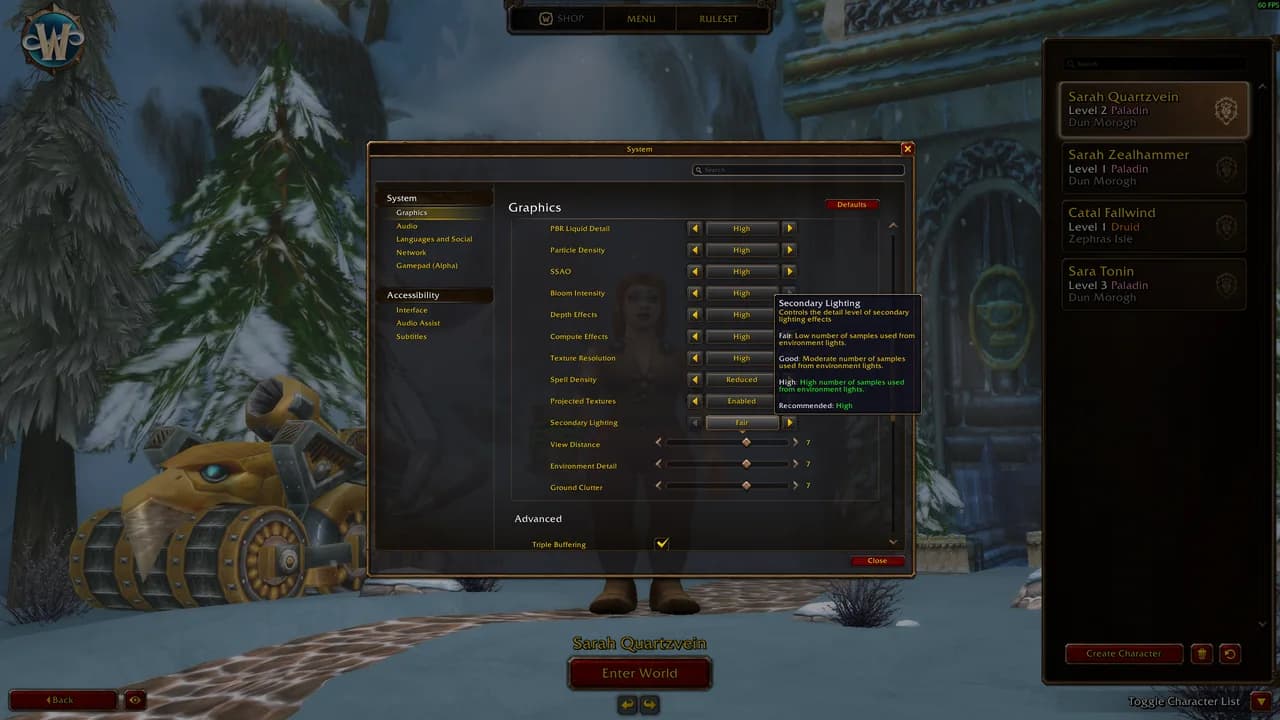
These aren't visual preferences. In a game where you level to 60 over 100-plus hours and dying costs real time, these are the ones that change outcomes. Set them first, before you touch a single graphics slider.
Spell Density: Essential (never lower)
Spell Density controls how many spell effects render. Dropping it to save frames is the single most common mistake players make, because it hides the ground effects you're supposed to walk out of. Essential is the floor — it strips the decorative effects and keeps the ones that matter mechanically. Going below Essential doesn't make you faster, it makes you dead.
Projected Textures: Enabled (always)
Projected Textures is what draws effects onto the ground — the circles, the cones, the pools. Disabled, you lose the visual cue for a large share of boss and elite mechanics. This setting has a real frame cost and it is not negotiable. Leave it on, find your frames somewhere else.
Target of Target: On
Every role, no exceptions. Tanks use it to see what the boss is actually looking at. Healers use it to see who's about to take a hit. DPS use it to confirm they're on the right target and to spot a tank swap before the raid leader calls it. It costs nothing and it's off by default.
Highlight Important Casts: On
With boss warning addons unable to read combat data, this is the native replacement for "something important is being cast right now." Turn it on. Then actually look at it.
Show Silhouette When Obscured: On
You behind a pillar is you not knowing where you are. Minor setting, meaningful in dense dungeon pulls.
Camera Following Style: Never
This is the one experienced players change first and new players never find. The default camera drifts to re-centre itself behind your character, which fights you every time you're manually controlling the camera in combat. Set it to Never and the camera stays exactly where you put it. The adjustment takes about ten minutes and then you never want it back.
Where Your Frames Actually Come From

If you're hunting FPS, these are the settings ranked by what they cost you, heaviest first. Work down the list and stop when you've hit your target — there's no reason to gut the whole menu.
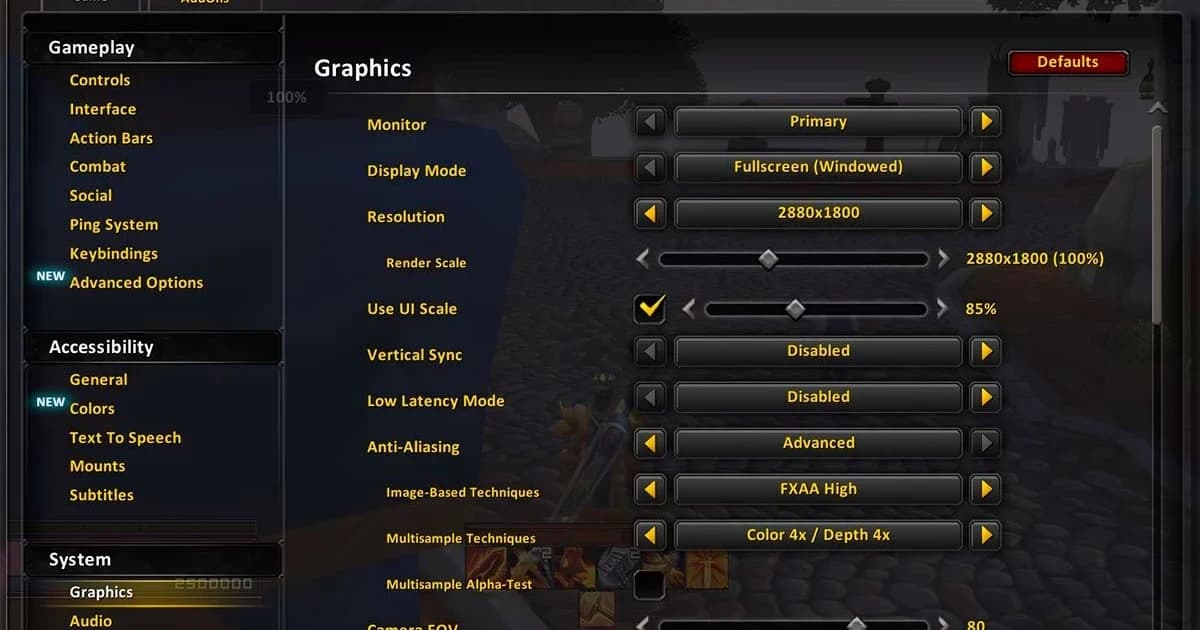
1. Render Scale. The biggest single lever by a wide margin, because it changes how many pixels the GPU draws. Native resolution at 100% is the baseline. Drop to 85% first — it's usually invisible in motion and buys real frames. 75% if you need more. Below 100%, FSR 1.0 is the resample option, and it can produce visible artifacts around spell effects and text, so step down gradually rather than jumping straight to 75%.
2. Shadows. The second-heaviest setting and the cheapest to sacrifice. Low or Fair costs you almost nothing you'll notice during gameplay. Ray-Traced Shadows: Disabled — the cost-to-benefit on this one is poor in a game where you spend most of your time looking at the middle of a pack of mobs.
3. SSAO. Ambient occlusion adds soft contact shadows. It's pure atmosphere. Low or Disabled.
4. Liquid quality (Legacy and PBR). Water rendering is expensive and you are rarely looking at water during content that matters. Legacy Liquid: Fair. PBR Liquid: Low or Fair.
5. Compute Effects and Secondary Lighting. Both meaningful costs, both atmospheric. Compute Effects Low or Good; Secondary Lighting Fair or Good.
6. Depth Effects. Depth of field blur. Disabled. It actively makes distant threats harder to read.
Keep these higher than instinct tells you:
Textures: High if you have the VRAM for it. Textures are a memory cost, not a per-frame GPU cost — lowering them rarely gives you frames and always makes the game look worse. This is the setting people lower first and should lower last.
View Distance: 7 on mid-range, 5 to 7 on low-end. Forever's open world is the content. Maxed shadows in a 40-yard bubble is the wrong trade.
Texture Filtering: 16x Anisotropic. Essentially free on any GPU that meets the minimum.
Frame caps and sync:
VSync: Off if you have G-Sync or FreeSync; On only if you're getting tearing without it
Low Latency Mode: Auto Detect or Enabled
Max Foreground FPS: match your display refresh rate
Max Background FPS: 30 — stops the client cooking your GPU while you're alt-tabbed in a queue
Target FPS: Off — it dynamically degrades your settings mid-fight, which is the opposite of what you want when a fight gets busy
Physics: Player Only — cloak and hair physics on forty raid members is a cost with no benefit
Anti-Aliasing: Image-Based, CMAA 2 — the best quality-to-cost option available
The Native UI: What Replaced Your Addons
This is the section that matters most in Forever and the one most settings guides skip, because it requires knowing what the addon API restrictions actually removed.
Cooldown Manager: On
Built into the client, and it's your rotation tooling now. Hekili and WeakAuras cannot read the combat data they'd need to replace it. Turn it on and configure it properly in Edit Mode.
One honest caveat: Cooldown Manager coverage was still incomplete for some classes during beta. If yours looks thin, that's a known gap rather than something you've configured wrong, and it should fill in by launch or shortly after.
Damage Meter: Built In
Blizzard ships one. Details still loads and is listed as compatible, but its numbers are limited by the same API restrictions — so the native meter is the one that sees everything it's allowed to see. Use it as your primary.
Swing Timer: Built In
Relevant for Warriors, Rogues, Hunters, and anyone whose rotation cares about auto-attack timing. It's in the client, it's accurate, and the addon versions can't match it under the current API.
Edit Mode ships with the modern client, which is why Forever doesn't need a frame-mover addon. Two settings make it usable:
Grid and Snap: On while you're editing — turn it off when you're done
Personal Resource Display: Only in Combat — information when you need it, clean screen when you don't
Status Text: Percentage and Value
Both numbers, everywhere. "The boss is at 23%" and "the boss has 14 million health left" answer different questions and you want both.
Featured Product
WoW Forever Character Leveling
Use code BLOG10 for 10% off!
Raid Frames and Healing Setup
Healers get the most out of Forever's native frames, and this is where to spend your configuration time.
Raid frame settings:
Raid-Style Party Frames: On — one consistent layout for dungeons and raids, so your muscle memory transfers
Class Colors: On — faster target identification than name-reading, every time
Power Bars: On — you need to see healer mana and tank resource
Dispellable Debuffs: On — non-negotiable for any healer
Keep Groups Together: On for organised raids, off for pugs where groups shuffle
Pets: Off unless you're healing a fight where pet health is a mechanic
Health Text: percentage and value
Frame size: large enough to read a debuff icon at a glance. Healers, put the frames near screen centre — the habit of tucking them in a corner costs you reaction time on every single fight.
Casting setup:
Mouseover Casting: On for healers and support
Click Casting: bind your core heals and your dispel. This is built into the client now, so there's no reason to go without it.
Self Cast Key: Alt, or whichever modifier your hand finds without thinking
Enemy Nameplates: On always
Friendly Nameplates: Off in raids — in a 20-player fight they're visual noise that hides the thing you need to see
Do this before your first dungeon, not during it. Click casting and mouseover binds are the difference between a healer who's reacting and a healer who's clicking frames. Ten minutes in the settings menu on launch day pays for itself in your first Deadmines run.
Settings by Ruleset
Forever replaced realms with rulesets — you pick a playstyle, not a server. Your ruleset changes which settings matter, and no generic preset accounts for that.
On a PvP ruleset:
Enemy Nameplates: On, and increase nameplate distance to maximum. Seeing an enemy player two seconds earlier is the entire game.
Friendly Nameplates: On in the open world, unlike raids — you want to know who's nearby and who isn't in your group.
Keep View Distance high. Low View Distance on a PvP ruleset means players render into existence at knife range. This is the one scenario where View Distance is a survival setting rather than a visual one.
Remember you're locked to one faction per account on the PvP ruleset. That's a character creation decision, not a settings one, but it's worth knowing before launch day.
On a PvE ruleset:
Friendly Nameplates off in group content, your preference in the world
You can afford the frames you'd otherwise spend on nameplate distance
While levelling, on any ruleset:
Combine Bags: On. Levelling means constant inventory management and a single bag window is faster. Switch it off at 60 if you prefer sorted bags for professions.
Auto Loot: On. You are about to loot several thousand corpses.
Sticky Targeting: On.
Keep Ambience and Music higher than you will at 60 — the levelling experience is most of your first month and the atmosphere is genuinely part of it.
Audio Is a Mechanic Cue System
Treat your sound mix as information, not atmosphere, once you're in group content.
Channel | Levelling | Raids and dungeons |
|---|
Sound Effects | 80–100% | 90–100% |
Dialogue | 70–100% | 70% |
Ambience | 40–60% | 20–30% |
Music | 20–40% | 0–20% |
The reasoning: boss mechanics have audio cues, and ambience and music are the two channels that mask them. Keep them up while you're questing and the world is the point. Pull them down when a cast sound is the difference between living and not.
Other audio settings:
Error Speech: Off once "I don't have enough rage" has worn out its welcome
Sound in Background: On if you alt-tab during queues
Headphone Mode: On with headphones — directional audio for positional mechanics
Voice Chat: On when your group uses it
Controller Setup
Forever has native gamepad support, so ConsolePort isn't needed.
Layout: Xbox or your controller's native layout
Camera Sensitivity: Medium
Targeting: Soft targeting
Action Targeting: On for levelling and melee specs
LT/RT: action bar layers
D-pad: targeting and utility
ABXY: your core rotational abilities
Radial menu: mounts, consumables, bags, utility
Interface Cursor: Enabled
Honest assessment: controller works well for levelling, open world, and melee DPS. Keyboard and mouse remain meaningfully better for inventory management and for dense raid healing, where you're targeting specific frames under time pressure. Plenty of players level on a controller and swap for raid night.
Full Presets
If you want numbers to copy, here they are. Set the survival settings above first, then apply these.
Mid-Range PC
Setting | Value |
|---|
Display | Fullscreen (Windowed) |
Resolution | Native |
Render Scale | 100% |
VSync | Off with G-Sync/FreeSync |
Low Latency Mode | Auto Detect or Enabled |
Anti-Aliasing | Image-Based, CMAA 2 |
Graphics Quality | 5, then customise below |
Textures | High |
Texture Filtering | 16x Anisotropic |
Shadows | Low or Fair |
Legacy Liquid | Fair |
PBR Liquid | Low or Fair |
Particle Density | Good |
Spell Density | Essential |
Projected Textures | Enabled |
SSAO | Low or Disabled |
Bloom | Low |
Depth Effects | Disabled |
Compute Effects | Low or Good |
Secondary Lighting | Fair or Good |
View Distance | 7 |
Environment Detail | 5 |
Ground Clutter | 3–5 |
Ray-Traced Shadows | Disabled |
Physics | Player Only |
Max Foreground FPS | Match display |
Max Background FPS | 30 |
Target FPS | Off |
Low-End PC
Setting | Value |
|---|
Resolution | Native 1080p, or 1600x900 |
Render Scale | 85% first, 75% if needed |
Graphics Quality | 3, then customise below |
Anti-Aliasing | CMAA 2 |
Textures | Medium (High if VRAM allows) |
Shadows | Low |
Legacy Liquid | Fair |
PBR Liquid | Low |
Particle Density | Low |
Spell Density | Essential |
Projected Textures | Enabled |
SSAO | Disabled |
Depth Effects | Disabled |
Ray-Traced Shadows | Disabled |
Bloom | Low |
Compute Effects | Low |
Secondary Lighting | Fair |
View Distance | 5–7 |
Environment Detail | 3 |
Ground Clutter | 3 |
Physics | Player Only |
Max Foreground FPS | 60 |
Max Background FPS | 30 |
Target FPS | Off |
For low-end builds, the order of sacrifice is: render scale → shadows → SSAO and depth effects → liquid → compute effects and secondary lighting → environment detail and ground clutter. Textures and View Distance go last, and Spell Density and Projected Textures don't go at all.
One Beta Bug Worth Knowing
Through beta, saved settings were being written to disk but not loaded when the client started fresh — meaning HUD layouts and keybinds reset on you. If it happens to you at launch, you haven't done anything wrong. Export your Edit Mode layout once you're happy with it, and check your keybinds after any patch day until it's confirmed fixed.
FAQ
Do I need addons in WoW Forever? No, and for combat purposes you largely can't use them anyway. Combat values are secret to the addon API — enemy health, damage numbers, and threat are hidden — so rotation helpers, threat meters, and boss warning addons can't function the way they did in Classic. Blizzard built the Cooldown Manager, damage meter, and swing timer into the client to cover the gap, and boss fights are designed to be playable without warning addons.
Will my old Classic addons work? Some load, many break. Forever uses the modern client API with the same restrictions as Midnight, so Classic-era addons need updating, and the ones that depend on combat data won't work regardless of updates. Quality-of-life addons — bags, auction house tools, map improvements — are generally fine.
What's the single biggest setting for FPS? Render Scale. Drop it to 85% before you touch anything else. It's the only setting that changes how many pixels your GPU has to draw, so it scales better than everything below it combined.
Can a GTX 1060 run Forever? Yes. The GTX 10 series is listed as a starting point for the minimum spec, and 6 GB clears the 4 GB VRAM requirement. Use the mid-range preset, drop Render Scale to 85–90% if you want headroom in raids.
Which settings should I never lower? Spell Density below Essential and Projected Textures off. Both hide ground effects you're supposed to react to. Everything else on the graphics menu is a visual trade — those two are gameplay trades.
Should I use Target FPS to stabilise my frame rate? No. Target FPS degrades your settings dynamically to hit a number, which means it drops quality exactly when a fight gets busy — the moment you most need to see what's happening. Set a manual frame cap instead and let your settings stay predictable.
The Short Version
Set Spell Density to Essential, Projected Textures on, Target of Target on, Highlight Important Casts on, and Camera Following Style to Never. Turn on the Cooldown Manager. If you heal, set up click casting and mouseover before your first dungeon. Then hunt frames in this order: Render Scale, Shadows, SSAO, Liquid — and leave Textures and View Distance alone.
Everything else is taste.
Featured Product
WoW Forever Gold
Use code BLOG10 for 10% off!


 WoW Forever